 Pin This
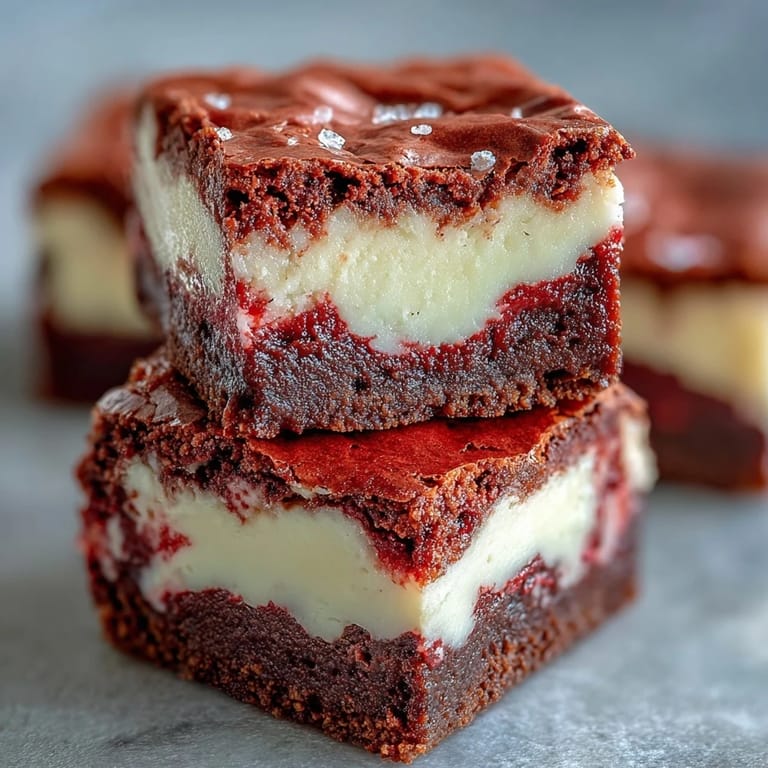
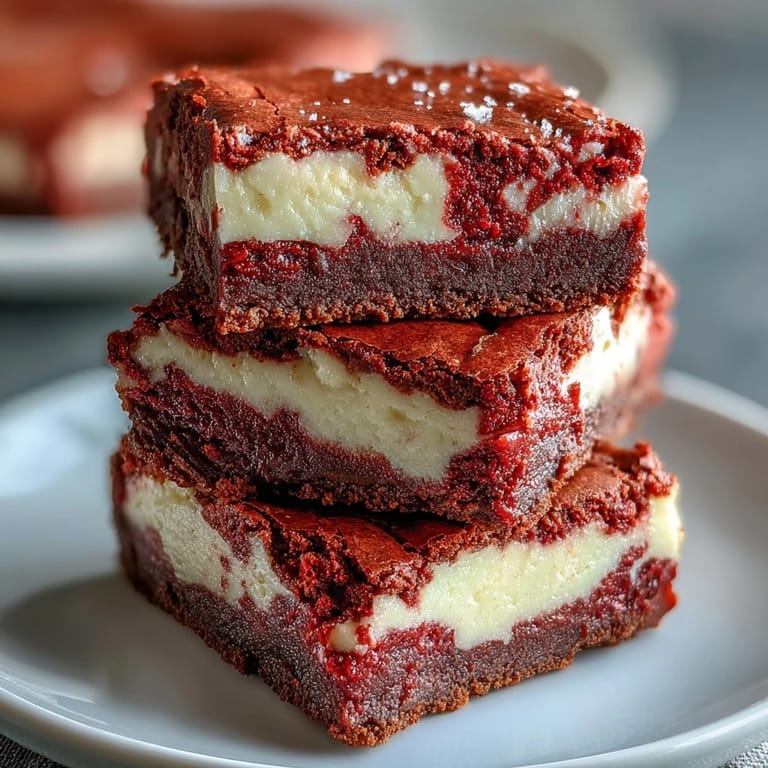
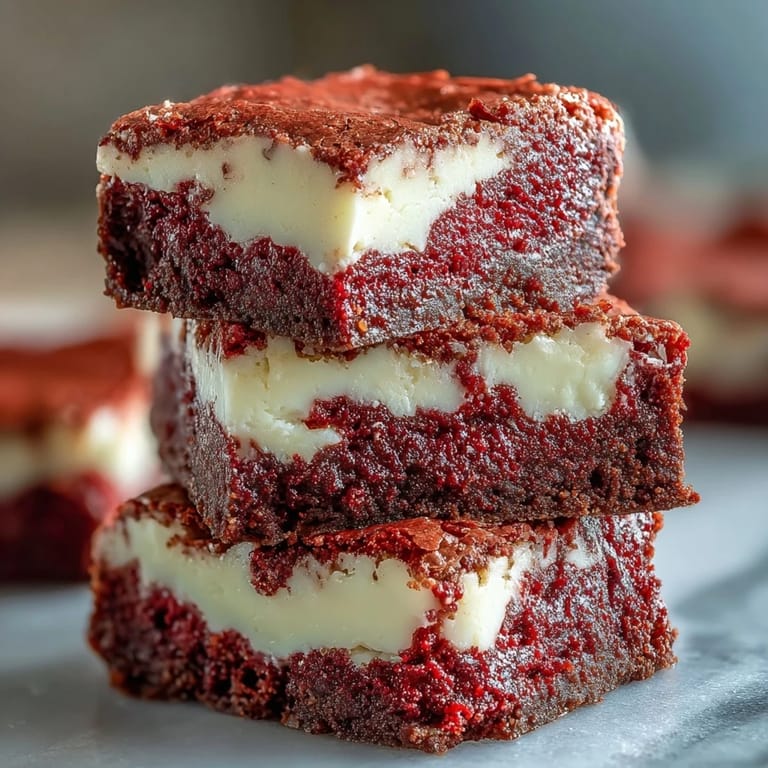
 My sister showed up at my door one Saturday morning with cream cheese and a bottle of red food coloring, insisting we needed to make something that looked as dramatic as it tasted. We had no plan, just a craving for something fudgy and swirled. What came out of the oven that afternoon was a pan of these red velvet cheesecake brownies, marbled and messy in the best way. They disappeared before dinner, and I've been making them ever since. Sometimes the best recipes start with spontaneous cravings and a little chaos.
I brought these to a potluck once, and people kept asking if I ordered them from a bakery. The red velvet against the cream cheese creates this visual drama that makes them seem way more complicated than they actually are. I watched someone take a bite and pause, surprised by how rich and tangy they were. That moment reminded me how much joy a really good brownie can bring to a room.
Ingredients
- Unsalted butter: Melted butter gives the brownie layer that dense, fudgy texture without making it cakey.
- Granulated sugar: Sweetens both layers and helps create that shiny, crackly top on the brownie base.
- Eggs: Room temperature eggs blend more smoothly and create a silkier cheesecake layer.
- Vanilla extract: A little vanilla in both batters ties the flavors together and adds warmth.
- Red food coloring: Gel works best for a deep, vibrant red without thinning the batter too much.
- All-purpose flour: Just enough to give structure without turning the brownies dry or dense.
- Unsweetened cocoa powder: Adds that classic red velvet hint of chocolate without overpowering the tanginess.
- Cream cheese: Softened cream cheese is essential for a smooth, lump-free cheesecake swirl.
Tired of Takeout? 🥡
Get 10 meals you can make faster than delivery arrives. Seriously.
One email. No spam. Unsubscribe anytime.
Instructions
- Prep your pan:
- Preheat your oven to 175 degrees Celsius and line your baking pan with parchment paper, leaving some overhang so you can lift the brownies out easily. This small step saves you from wrestling with a spatula later.
- Mix the red velvet base:
- Whisk melted butter and sugar until smooth, then add eggs, vanilla, and red food coloring. Sift in flour, cocoa, and salt, folding gently until just combined.
- Reserve some batter:
- Set aside a quarter cup of the red velvet batter for swirling on top. Spread the rest evenly in your prepared pan.
- Make the cheesecake layer:
- Beat softened cream cheese until smooth, then add sugar, egg, and vanilla. Mix until creamy and completely lump-free.
- Layer and swirl:
- Pour the cheesecake mixture over the red velvet base and spread it evenly. Dollop the reserved red velvet batter on top and use a knife or skewer to create swirls.
- Bake and cool:
- Bake for 35 minutes until the center is just set and a toothpick comes out with moist crumbs. Cool completely in the pan, then refrigerate for at least two hours before slicing.
 Pin This
 The first time I served these at a birthday dinner, someone cut into them while they were still warm and the whole pan turned into a delicious mess. We laughed and ate it with spoons straight from the pan, and honestly, it tasted incredible. But now I know that patience makes all the difference if you want those picture-perfect squares. Sometimes the lesson is just as sweet as the dessert.
Storing and Serving
These brownies keep beautifully in the fridge for up to five days, tucked into an airtight container. I like serving them chilled because the cheesecake layer stays firm and creamy, but you can let them sit at room temperature for ten minutes if you prefer a softer bite. They also freeze well for up to a month, wrapped tightly in plastic and foil.
Customizing Your Brownies
If you want extra richness, fold white chocolate chips into the red velvet batter before spreading it in the pan. I've also added a handful of chopped pecans on top before baking, which gave them a nice crunch and a little rustic charm. You can dial the red food coloring up or down depending on how dramatic you want them to look.
Troubleshooting Common Issues
If your cheesecake layer sinks or cracks, your oven might be running too hot, so use an oven thermometer to check. Overmixing the red velvet batter can make the brownies tough, so fold gently and stop as soon as the flour disappears. If the swirls disappear during baking, you might have stirred too much, a light hand creates the prettiest marbling.
- Use parchment paper with enough overhang to lift the brownies out cleanly.
- Let them chill fully before cutting, or use a hot, clean knife for neat slices.
- Taste the batter and adjust vanilla or sugar to your preference before baking.
 Pin This
 These brownies have become my go-to whenever I want something that feels special without spending all day in the kitchen. They're rich, they're gorgeous, and they always make people smile.
Recipe Questions & Answers
- → Can I use natural food coloring instead of red dye?
Yes, you can substitute with natural alternatives like beet powder or natural red food coloring, though the color may be less vibrant. Adjust quantity as needed for desired hue.
- → Why do I need to refrigerate these brownies?
Refrigeration helps the cheesecake layer set properly and enhances the fudgy texture. It also makes cutting cleaner, resulting in neat squares with beautiful swirls.
- → Can I make these in a larger pan?
Yes, but using a 9x13-inch pan will result in thinner brownies. Reduce baking time to 25-30 minutes and check for doneness earlier to prevent overbaking.
- → How do I know when they're properly baked?
The center should be just set with a slight jiggle, and a toothpick inserted should come out with a few moist crumbs—not wet batter. The cheesecake layer will firm up during cooling.
- → Can I freeze these brownies?
Absolutely! Wrap individual squares in plastic wrap, then store in an airtight container. Freeze for up to 3 months. Thaw in the refrigerator overnight before serving.
- → What causes the cheesecake layer to crack?
Overbaking or sudden temperature changes can cause cracking. Bake just until set, avoid opening the oven door frequently, and let them cool gradually at room temperature before refrigerating.